Proxmox VE
All docs on Proxmox VE
- Proxmox VE Configuration
- [How-To] Add Web Server to Proxmox VE Node
- [How-To] Join PVE Node to Active Directory Domain
- [How-To] Unlock CT Manually via Shell
- [How-To] Delete CT Manually in Shell
- Proxmox VE Storage
Proxmox VE Configuration
All docs related to Proxmox VE configuration
[How-To] Add Web Server to Proxmox VE Node
Introduction
This allows you to access Proxmox VE via the port 443
Tested from Proxmox 3.4 - 6.3
Why do I need this?
Sometimes there is a firewall restriction that blocks port 8006 and since we shouldn't touch the port config in proxmox we'll just use nginx as proxy to provide the web interface available on default https port 443. Now let's begin...
Configuration
Install nginx
apt install nginx -yRemove the default config file
In newer PVE and Debian versions:
rm /etc/nginx/sites-enabled/default
Create a new config file
nano /etc/nginx/conf.d/proxmox.conf
Note: You can choose the configuration filename freely, but it must have a .conf ending.
The following is an example config that works for the web interface and also the noVNC console:
upstream proxmox {
    server "YOUR.FQDN.HOSTNAME.HERE";
}

server {
    listen 80 default_server;
    rewrite ^(.*) https://$host$1 permanent;
}

server {
    listen 443;
    server_name _;
    ssl on;
    ssl_certificate /etc/pve/local/pve-ssl.pem;
    ssl_certificate_key /etc/pve/local/pve-ssl.key;
    proxy_redirect off;
    location / {
        proxy_http_version 1.1;
        proxy_set_header Upgrade $http_upgrade;
        proxy_set_header Connection "upgrade";
        proxy_pass https://localhost:8006;
	proxy_buffering off;
	client_max_body_size 0;
	proxy_connect_timeout  3600s;
        proxy_read_timeout  3600s;
        proxy_send_timeout  3600s;
        send_timeout  3600s;
    }
}
When doing this for a proxmox backup server, user the dir /etc/proxmox-backup/proxy.pem and /etc/proxmox-backup/proxy.key as that is where they are located. Also, use port 8007 as that is the port that pbs listens on.
Change the FQDN part to the fully qualified domain name of your host, you can check cat /etc/hosts output to find yours. in my case it was pve-dev-machine.proxmox.com. save the file and then check the syntax:
nginx -t you should see:
nginx: the configuration file /etc/nginx/nginx.conf syntax is ok
nginx: configuration file /etc/nginx/nginx.conf test is successful
If you see this message then everything should work and you can proceed.
- Restart nginx
systemctl restart nginxAfter nginx service restarts you should be able to reach the web interface via either https://your.fqdn.goes.here or https://your.ip.address.goes.here
Post Setup
- ensure that nginx gets only started after the certificates are available
As the certificates reside on /etc/pve which is provided by the pve-cluster.service we need to tell nginx.service to only start after that one.
The easiest and cleanest way to do that is to add a Requires and After as a systemd override snippet.
This can be done with systemd edit UNIT which opens your $EDITOR:
systemctl edit nginx.servicehere add:
[Unit]
Requires=pve-cluster.service
After=pve-cluster.service
and save + exit.
Enjoy the web interface on HTTPS port 443!
[How-To] Join PVE Node to Active Directory Domain
Purpose
This tutorial will walk through the steps necessary to join your Proxmox VE server to Microsoft Active Directory on a Windows Server.
Prerequisites
List of prerequisites:
- Root user
- PVE Node
- Active Directory Domain
- Domain Admin User
Standard Name
You will be able to sync your users and groups into the Proxmox Permissions Panel in the GUI, and log into the web console with active directory credentials.
Here are the general steps:
- Set basic settings
- Add Active Directory Realm & Sync Users
- Configure Permissions
- Install packages from the repository
- Join the Active Directory domain
- Test your config
In this tutorial, our realm/domain will be infraredhat.com
Two domain controllers have been configured, and are acting as DNS servers.
Our subnet is 192.168.11.0/24
The Proxmox node a single network interface with a static IP of 192.168.11.10/24
The Domain Controllers (and DNS servers) have IP's of 192.168.11.11 and 192.168.11.12.
Set the search domain to infraredhat.com, and set the DNS servers to the IP addresses of the Domain Controllers, 192.168.11.11 and 192.168.11.12.
Configure hosts file with your Proxmox server's FQDN (and hostname).
Click on the "Sync Options" Tab.
You'll need Active Directory credentials to access domain controller users and groups. You can simply use the Administrator Account, but for more security, you can create a user account with read-only access to the domains objects instead. For demonstration, let's use the built in "Administrator".
For the "Bind User", you'll need to enter it a very specific way.
Navigate to your domain controller and open a powershell window as admin.
SUPER IMPORTANT!!! (AND NOT VERY WELL DOCUMENTED!!!)
For the correct string to enter for the Adminstrator in the infraredhat.com domain, you would enter the following command:
dsquery user dc=infraredhat,dc=com -name AdministratorThis is the output, and you can copy and paste it directly into the field, "Bind User"
CN=Administrator,CN=Users,DC=infraredhat,DC=comEnter the password for this user. For now you can ignore the remainder of the fields. I've set my default sync preferences.
Click OK to close and save.
You can now select your Active Directly Realm from the list (listed alongside PAM and PVE). Click SYNC from the menu and you should see your AD Users and Groups populate.
Configure permissions to tell Proxmox what access to give each user/group
Next, Navigate to the "Permissions" Menu > Add > Group Permission
I've selected the Administrators Group from Active directory, and assigned the PVE Administrator Role to this Group.
This way, any user in the AD Administrator group will also be a PVE Administrator.
Select '/' to give full access as well.
Click OK.
Install additional packages needed for system security
Next, Navigate to a shell window on your PVE Node. There are a few packages to install and configure.
Update your packages, and install adcli, packagekit, samba-common-bin realmd
The remainder of the required packages will be auto-installed and configured.
apt update
apt dist-upgrade

# install the following packages (use apt list to see if they are needed)
apt install adcli packagekit samba-common-bin

# install realmd
apt install realmd
Join the node to the domain
Next, test connection with the domain controller, and then join the domain. For additional options, see the man pages by running the command man realm. Since we're doing a high level walkthrough, I'm keeping it simple. Because no user is specified in the join command, realmd defaults to "Administrator" for this action.
# test realmd
realm -v discover infraredhat.com
You'll see an output with information about your DC and domain, along with additional required packages. Installing these in advance will cause the configurations to fail. Simply enter this command, substituting your own domain.
#join the domain
realm -v join infraredhat.com
Follow the prompts, enter the Active Directory Admin password when prompted and allow the sssd and additional packages install.
You are now joined to the domain and you should see your Proxmox node appear as a computer in Active Directory Users and Computers. Congrats!
Configure additional settings and test your config
You can edit the config in /etc/sssd/sssd.conf. Run
pam-auth-updateand select the appropriate option if you would like home directories created for AD users. There is more information available on the internet about sssd.conf. Test your configuration with the command
id administrator@infraredhat.com- you should see UID and GID from your domain controller.
Finally, log out of Proxmox in the menu in the upper right hand corner, and test by logging in as Administrator@infraredhat.com in the login menu by selecting the Active Directory domain from the login drop-down instead of PAM. You should successfully authenticate and log in. Beware, you will not have shell access to Proxmox in the console... that's only available to root, logged in under local PAM. For shell access, you'll need to configure ssh separately.
Thank you!
Remember to add permissions to users and groups who need access in the PVE menu.
Repeat the package-install and domain-join process for each additional node that exists in a cluster. User and group sync and permissions are managed cluster-wide and only has to be configured once.
Great post, thank you for this it really helped.
If anyone needs a way to filter only specific users from specific groups, this is how I got it to work.
- When configuring the sync options for Active Directory, under "user filter" use these search parameters:
Code:(&(objectclass=user)(samaccountname=*)(MemberOf=CN=group_name_here,OU=name,DC=domain,DC=tld)) - If DOMAIN.COM, is my root Active Directory tree, and USERS is a subfolder, which contains my users, you need to add a security group inside of the subfolder. In this example I will call my security group "TECHS", this is a group inside the "USERS" folder under the DOMAIN.COM tree.
- Make sure your users are inside this "USERS" folder along with the "TECHS" group. Add your users to the "TECHS" group. Done.
- Now in proxmox your query should be as follows (using the example parameters above):
Code:(&(objectclass=user)(samaccountname=*)(MemberOf=CN=TECHS,OU=USERS,DC=DOMAIN,DC=COM)) - Done. Now inside of proxmox datacenter view, if you go to "Users" you should see your Active Directory users, that were part of whatever group you added them too.
- Select "Permissions" and click on "Add" above, click "Add user permissions" give them whatever permission they need to have.
When they login, they just need to use their username, at least thats how it worked for me. If you add their full mail address, e.g. "user@domain.com" proxmox appends the domain anyways, so itll try to login as "user@domain.com@domain.com", hence why you just need to put your username, e.g. "user" and thats it.
[How-To] Unlock CT Manually via Shell
Purpose
Manually unlock CT via the proxmox node shell.
Prerequisites
List of prerequisites:
- Root user for Proxmox Node
- Debian 12 CT in Proxmox
Unlocking the LXC container with the pct tool
Proxmox VE provides the pct tool to manage Linux containers (LXC). To manually have the lock removed, simply issue the command pct unlock 107. This removes the lock on container 107. Deleting the failed snapshot can be performed by issuing the command pct delsnapshot 107 vzdump.
Please refer to man pct for more detailed instructions.
[How-To] Delete CT Manually in Shell
Purpose
Manually delete CT via the proxmox node shell.
Prerequisites
List of prerequisites:
- Root user for Proxmox Node
- CT in Proxmox
Deleting the LXC container with the pct tool
Proxmox VE provides the pct command to assist with container actions. In this case, we will use this:
pct destroy 107This command where the number is the CT number assigned to it. Please refer to this:
man pctFor more detailed instructions.
If you get an error with this check the error output with this:
cat /etc/pve/lxc/107.confIf the LXC is locked, it will not work. Refer to the unlock page for this.
Proxmox VE Storage
All docs related to Proxmox VE Storage KBs.
[How-To] Create and Manage ISCSI Storage on Proxmox VE
Purpose
This How-To will guide you in creating and managing your ISCSI storage in the Proxmox Virtual Environment.
Prerequisites
List of prerequisites:
- Proxmox VE Node (Minimum 1)
- Root Credentials to Proxmox VE Node
- ISCSI LUN created on a remote storage target
Adding ISCSI Storage in Proxmox VE
Step 1: Add the ISCSI Storage in Web UI
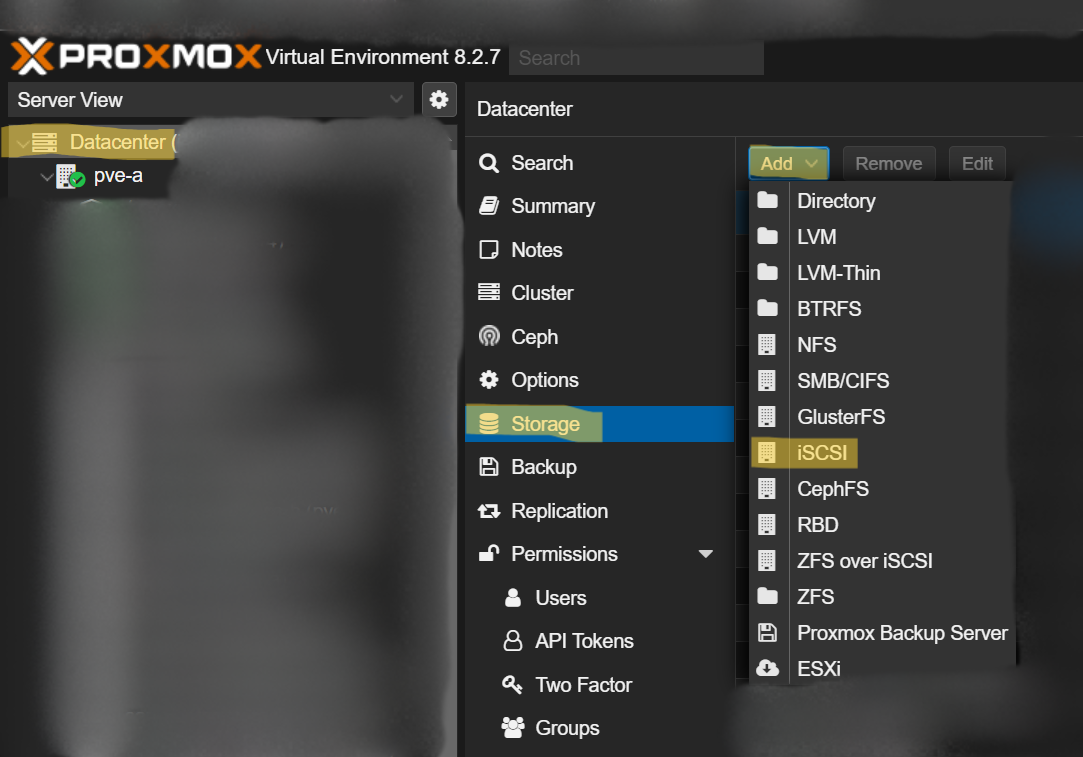
The first step is to add the storage iscsi lun in the proxmox web UI. This step assumes you already have the ISCSI lun created, target created, and available/allowed network-wise to get to the proxmox node. Login to proxmox and go to datacenter, storage. Then click add, ISCSI.
Within the Add ISCSI Storage window, give your iscsi storage a name in the ID: field. Then, enter the DNS or IP name of the target the ISCSI storage is available on. Then, use the drop-down list to select the correct target. Leave all nodes selected by default and leave enable checked. Make sure to un check Use LUNs directly.
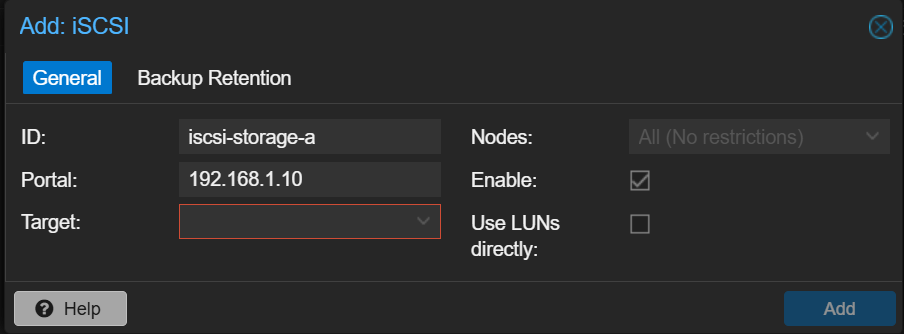
Checking "Use LUNs directly:" will allow vms disk images to be placed directly on the raw lun storage. This is not sharable to more than 1 PVE node. Unless you have a specific use case, the best practice is to not check this and create LVM with LUN.
Once you have this ready, click Add. This will map the ISCSI storage to each PVE node you have in the cluster. You may notice that the storage shows up as not active or with a "?" next to it on some nodes. You just need to rediscover it. Run this command on the affected nodes shell, the IP address being the IP of the ISCSI storage target:
iscsiadm -m discovery -t sendtargets -p 192.168.1.10Once you've done this, it should be available on the PVE node. You can verify with this command:
iscsiadm -m sessionOnce your storage has shown up and is working on all PVE nodes, you can move to the next step.
Step 2: Create an LVM on Raw LUN Space
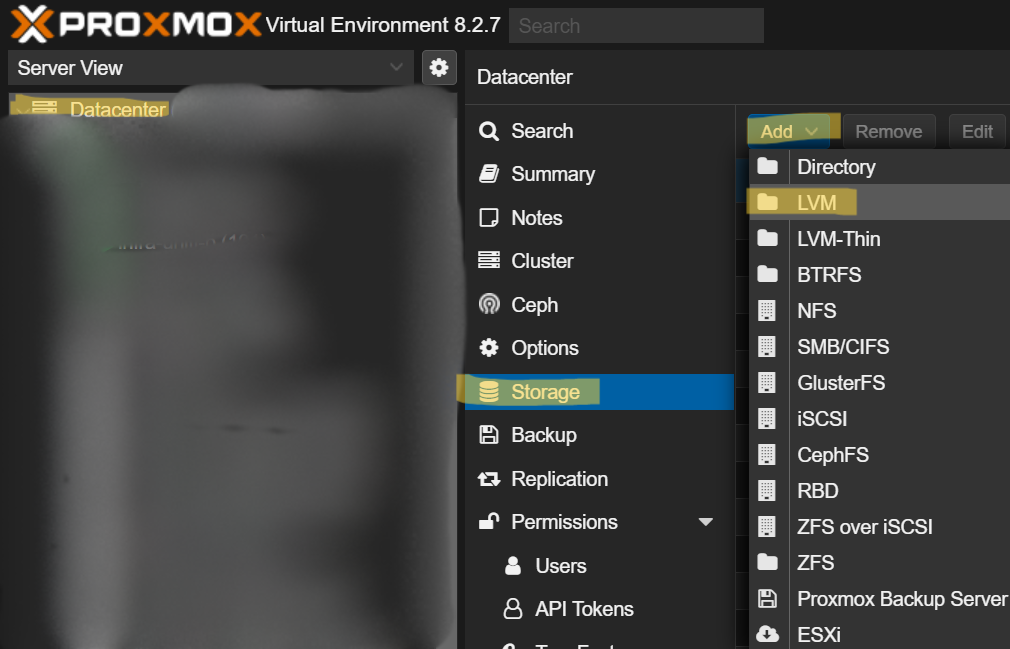
Now that your ISCSI storage is available on all PVE nodes, you need to make it usable for VMs/LXCs. The easiest way to do this is to create an LVM on the raw LUN space. To do this, again go to Datacenter, storage. Then, add, LVM.
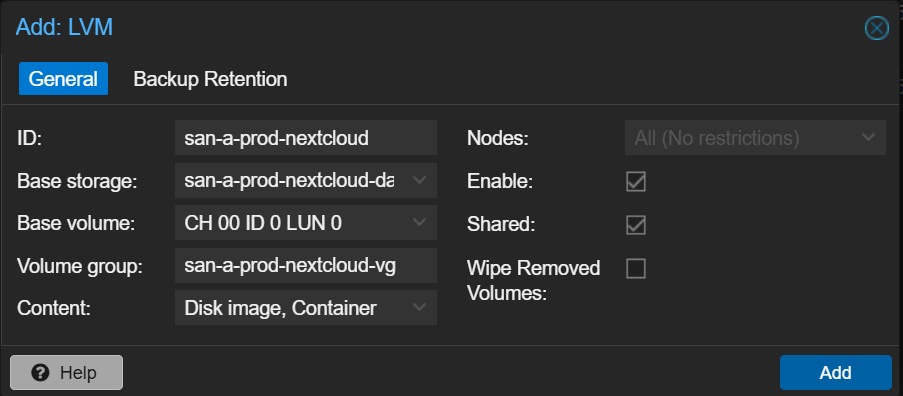
Once you are in the Add LVM window, give your ISCSI-backed LVM a name in the ID: field. Then, select the ISCSI storage as the Base storage. In the base volume, select the raw LUN storage on the ISCSI target. In Volume group, give a name. I usually follow what I set for the ID and add -vg to keep it simple. Select what content you want available, leave all nodes default selected, leave enable selected, check shared, and leave wipe not selected.
Once finished, select Add. This will add the LVM to all PVE nodes. If you see it show up as available storage to some nodes but inactive or with a "?" next to it for others, run this command on the inactive nodes shell:
vgcfgrestore new-volume-groupReplace new-volume-group with the actual name of your new volume group from above. This should resolve the issues. With storage available on all nodes, you should be finished. Now you can begin to move VMs and LXCs to the new storage over ISCSI. This will allow you to migrate between PVE nodes without changing storage.
Removing ISCSI Storage in Proxmox VE
Step 1: Remove the ISCSI Storage in Web UI
The first step is to remove both the lvm and the iscsi device in the us at the data center level.
Step 2: Remove the ISCSI Storage in Shell on each host
Run the following on each host to discovery/locate the desired iscsi lun to be deleted:
iscsiadm -m sessionThen, run the following on each host shell, inserting the name of the IQN from the last command for the iscsi lun you want deleted:
iscsiadm -m node -T iqn.2005-10.org.freenas.ctl:test-storage -uAfter this, run the first command again to verify it isn't there. Then move onto the next host until completed.
[How-To] Passthrough Hard Drive to VM
Purpose
The goal of this how to will be to demonstrate how to passthrough a hard drive, ssd, or nvm drive to a vm directly.
Prerequisites
List of prerequisites:
- admin pve user
- vm in pve
- unused and unformatted drives in pve
Instructions
Step 1: Gather Information About the Drives
First, we need to gather the needed information about the drives so we can structure our command to passthrough the drives to the VM. Start by running the following command on pve shell:
apt install lshwThis will install the lshw app that will allow you to better see your hard drives. Then, run this command:
lshw -class disk -class storageThis will list all disks by class and give you detailed information about them. We won't use anything from this results to passthrough the drives as that is possible to change. But we will use it to find the by-id disk in next command. Save the output and parse manually to find the sections where the drives you want to passthrough are at. Now, run the following command:
ls -l /dev/disk/by-id/This will list all disks by-id which is how we are going to pass them through as these IDs are specific to each disk and will never change. Now, match information about your disk from the first command to the disks in the second command. Take the by-id name of the disks you want to passthrough from the second command and put them in a list.
Step 2: Prepare Passthrough Commands
Now that we have our by-id disk names, we are ready to insert them into the command template below. Do this and put them commands in a list for each drive you wish to passthrough:
qm set 100 -scsi5 /dev/disk/by-id/ata-xxxxxxxxx-xxxxx_xxxThe number after scsi can be anything greater than 1, but can not be repeated. So if you passthrough more than one disk, start at 2 and go up for each disk from there. Then, where you see ata-xxx, replace all of that with your by-id disk name.
Step 3: Execute Commands
Next, we are ready to passthrough the drives. Simply run the commands you built one by one in pve shell. Once completed, browse to the vm's hardware tab in the pve web ui and verify they showed up. Then, boot the vm up and see if it actually worked.